
4Make it permanent and check paths
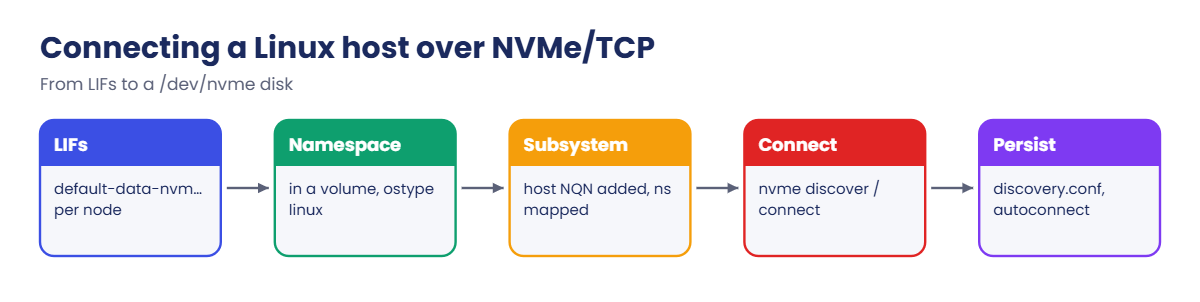
Save the discovery targets and enable the autoconnect service so the host reconnects at boot, then check ANA states with nvme list-subsys.
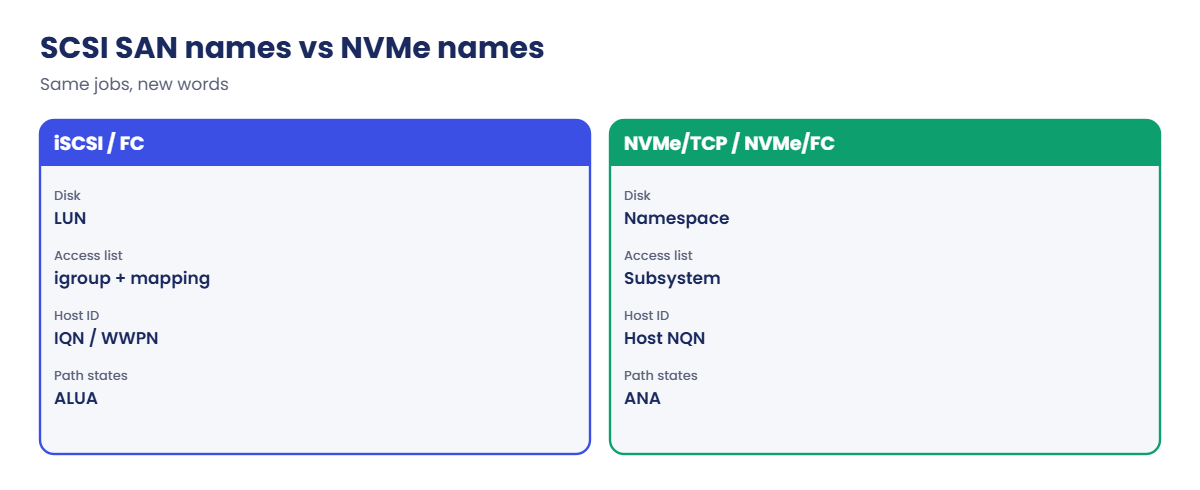
| SCSI SAN (iSCSI / FC) | NVMe-oF (TCP / FC) |
|---|---|
| LUN | Namespace |
| igroup + mapping | Subsystem (host NQNs + mapped namespaces) |
| IQN or WWPN | Host NQN |
| ALUA (AO / ANO) | ANA (optimized / non-optimized) |
| dm-multipath | Native NVMe multipath |
| TCP 3260 (iSCSI) | TCP 4420, discovery 8009 (NVMe/TCP) |
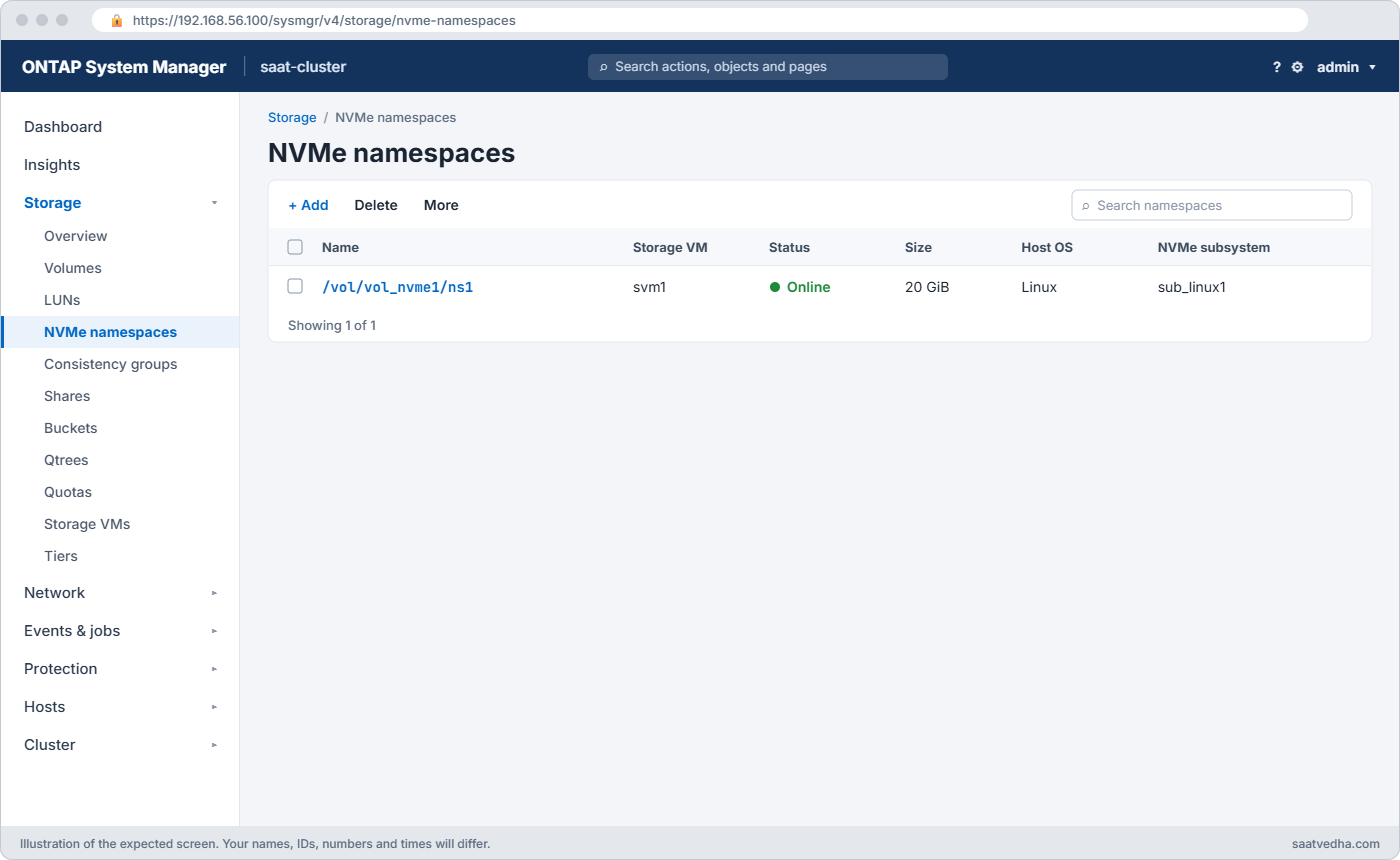
In System Manager: Storage › NVMe namespaces › + Add creates the namespace and subsystem together, and Hosts › NVMe subsystems lists the hosts.
Before you run any command, double-check it
Read every command twice before you press Enter. Check the target: the server name, the user, the disk or device name, the path and the sizes. These commands are for learning and were tested in our lab, not on your system. At work, run the read-only commands first, follow your change process, make sure a backup exists, and ask a second person to check anything that changes or deletes data. You run them at your own risk.
This lab uses the SaatVedha ONTAP practice shell, our own learning tool. It is not NetApp software: real ONTAP output looks like this but is not identical.
Everything here runs in the practice shell: the cluster in one terminal (python ontapsim.py) and the Ubuntu host linux1 in a second (python ontapsim.py --host linux1). The ONTAP commands are the real ONTAP 9.18.1 ones, and the host side uses nvme-cli exactly as on a real Ubuntu server.
1Start from a clean lab
Save these three lines as setup-28.txt, then reset and run them from your normal terminal:
storage aggregate create -aggregate aggr1_01 -node saat-cluster-01 -diskcount 8 -disktype SAS
storage aggregate create -aggregate aggr1_02 -node saat-cluster-02 -diskcount 8 -disktype SAS
vserver create -vserver svm1 -aggregate aggr1_01 -rootvolume-security-style unix
python ontapsim.py -c "simctl reset"
python ontapsim.py --run setup-28.txt✅ Checkpoint: Two aggregates and svm1 are created with no errors.
2Turn on NVMe, add LIFs, a namespace and a subsystem
Log in to the cluster shell and run:
vserver show -vserver svm1 -fields allowed-protocols
network interface create -vserver svm1 -lif svm1_nvme1 -service-policy default-data-nvme-tcp -home-node saat-cluster-01 -home-port e0d -address 192.168.56.141 -netmask 255.255.255.0
network interface create -vserver svm1 -lif svm1_nvme2 -service-policy default-data-nvme-tcp -home-node saat-cluster-02 -home-port e0d -address 192.168.56.142 -netmask 255.255.255.0
vserver nvme create -vserver svm1
vserver nvme show-interface -vserver svm1
volume create -vserver svm1 -volume vol_nvme1 -aggregate aggr1_01 -size 24g -space-guarantee none -snapshot-policy none
vserver nvme namespace create -vserver svm1 -path /vol/vol_nvme1/ns1 -size 20g -ostype linux
vserver nvme subsystem create -vserver svm1 -subsystem sub_linux1 -ostype linux
You should see this:
saat-cluster::> vserver show -vserver svm1 -fields allowed-protocols
vserver allowed-protocols
------- -------------------------------------
svm1    nfs, cifs, fcp, iscsi, ndmp, s3, nvme
saat-cluster::> network interface create -vserver svm1 -lif svm1_nvme1 -service-policy default-data-nvme-tcp -home-node saat-cluster-01 -home-port e0d -address 192.168.56.141 -netmask 255.255.255.0
saat-cluster::> network interface create -vserver svm1 -lif svm1_nvme2 -service-policy default-data-nvme-tcp -home-node saat-cluster-02 -home-port e0d -address 192.168.56.142 -netmask 255.255.255.0
saat-cluster::> vserver nvme create -vserver svm1
saat-cluster::> vserver nvme show-interface -vserver svm1
        Logical                               Transport
Vserver Interface       Home Node:Port        Protocols  Transport Address
------- --------------- --------------------- ---------- --------------------
svm1    svm1_nvme1      saat-cluster-01:e0d   nvme-tcp   192.168.56.141
svm1    svm1_nvme2      saat-cluster-02:e0d   nvme-tcp   192.168.56.142
2 entries were displayed.
saat-cluster::> volume create -vserver svm1 -volume vol_nvme1 -aggregate aggr1_01 -size 24g -space-guarantee none -snapshot-policy none
[Job 104] Job succeeded: Successful
saat-cluster::> vserver nvme namespace create -vserver svm1 -path /vol/vol_nvme1/ns1 -size 20g -ostype linux
saat-cluster::> vserver nvme subsystem create -vserver svm1 -subsystem sub_linux1 -ostype linux
One NVMe/TCP LIF per node, so the host gets a path through each node. The namespace is the disk; the subsystem is the list of hosts allowed to see it, still empty for now. Your job number may differ.
✅ Checkpoint: show-interface lists svm1_nvme1 and svm1_nvme2 with protocol nvme-tcp.
3Get linux1’s host NQN
Open the second terminal with python ontapsim.py --host linux1 and run:
nvme list
apt install -y nvme-cli
cat /etc/nvme/hostnqn
You should see this:
root@linux1:~# nvme list
Command 'nvme' not found, but can be installed with:

apt install nvme-cli
root@linux1:~# apt install -y nvme-cli
(apt output trimmed)
Setting up nvme-cli (2.8-1build2) ...
root@linux1:~# cat /etc/nvme/hostnqn
nqn.2014-08.org.nvmexpress:uuid:a1ce8f6a-977d-0b92-5b5d-02921e0195a9
Installing nvme-cli writes a host NQN to /etc/nvme/hostnqn. That string is to NVMe what the IQN is to iSCSI: the subsystem must list it, character for character. Copy yours.
✅ Checkpoint: You have linux1’s host NQN copied.
4Allow the host and map the namespace
Back in the cluster shell (put your own NQN in the first line):
vserver nvme subsystem host add -vserver svm1 -subsystem sub_linux1 -host-nqn nqn.2014-08.org.nvmexpress:uuid:a1ce8f6a-977d-0b92-5b5d-02921e0195a9
vserver nvme subsystem map add -vserver svm1 -subsystem sub_linux1 -path /vol/vol_nvme1/ns1
vserver nvme subsystem show -vserver svm1
vserver nvme namespace show -vserver svm1
You should see this:
saat-cluster::> vserver nvme subsystem host add -vserver svm1 -subsystem sub_linux1 -host-nqn nqn.2014-08.org.nvmexpress:uuid:a1ce8f6a-977d-0b92-5b5d-02921e0195a9
saat-cluster::> vserver nvme subsystem map add -vserver svm1 -subsystem sub_linux1 -path /vol/vol_nvme1/ns1
saat-cluster::> vserver nvme subsystem show -vserver svm1
Vserver Subsystem       Target NQN
------- --------------- --------------------------------------------------------
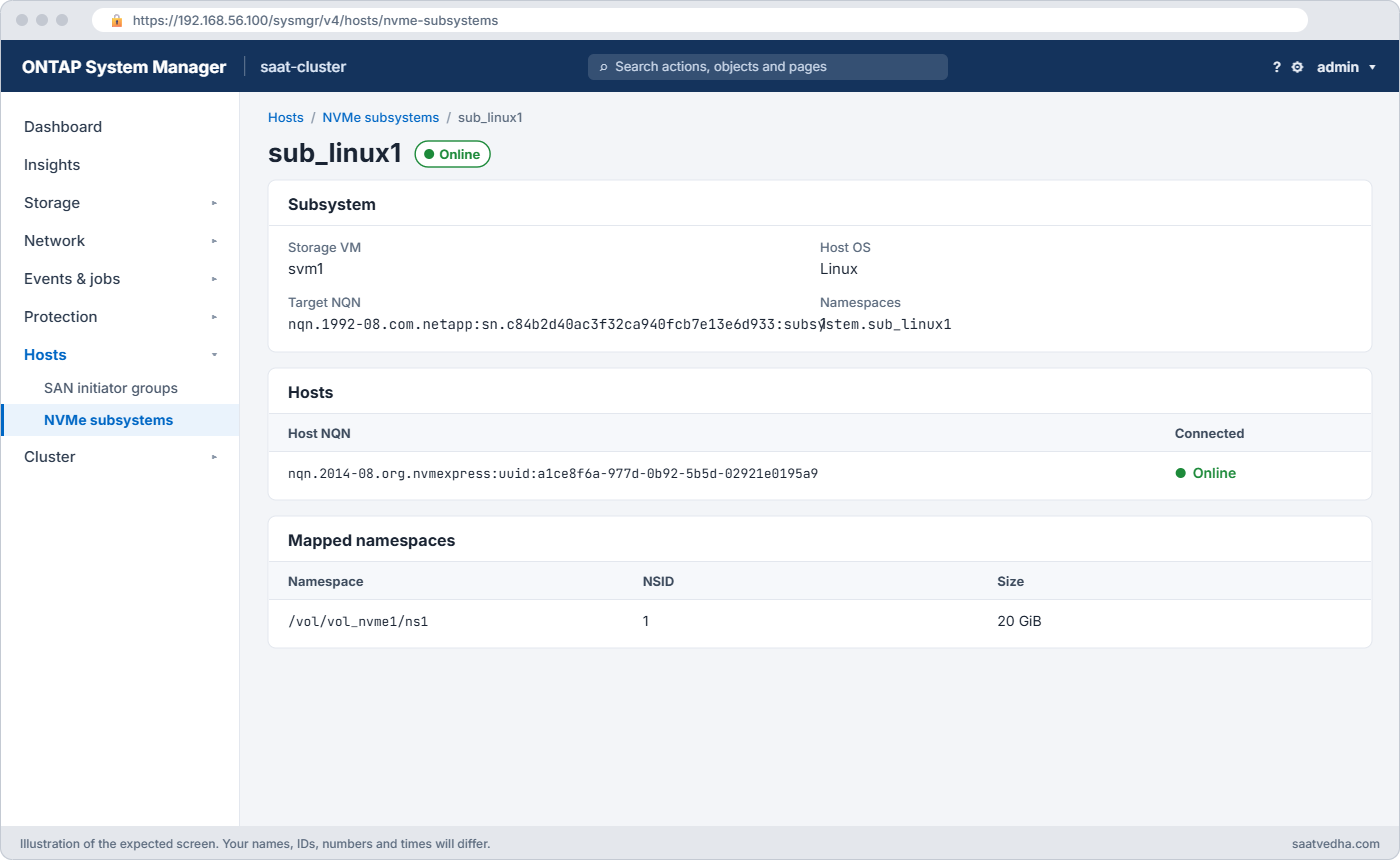
svm1    sub_linux1      nqn.1992-08.com.netapp:sn.c84b2d40ac3f32ca940fcb7e13e6d933:subsystem.sub_linux1
saat-cluster::> vserver nvme namespace show -vserver svm1
Vserver   Path                             State      Size Subsystem  NSID
--------- -------------------------------- ------- ------- ---------- ---------
svm1      /vol/vol_nvme1/ns1               online     20GB sub_linux1 00000001h
The subsystem has its own target NQN, and the namespace now shows Subsystem sub_linux1 with NSID 1. In System Manager the same job is Storage › NVMe namespaces › + Add, which creates the namespace and subsystem together.
✅ Checkpoint: The namespace is online and mapped to sub_linux1.
5Discover and connect from linux1
modprobe nvme-tcp
nvme discover -t tcp -a 192.168.56.141 -s 8009
nvme connect-all -t tcp -a 192.168.56.141 -s 8009
nvme list
nvme list-subsys
You should see this:
root@linux1:~# modprobe nvme-tcp
root@linux1:~# nvme discover -t tcp -a 192.168.56.141 -s 8009

Discovery Log Number of Records 4, Generation counter 4
=====Discovery Log Entry 0======
trtype:  tcp
adrfam:  ipv4
subtype: current discovery subsystem
treq:    not specified
portid:  7
trsvcid: 8009
subnqn:  nqn.1992-08.com.netapp:sn.c84b2d40ac3f32ca940fcb7e13e6d933:discovery
traddr:  192.168.56.141
eflags:  explicit discovery connections, duplicate discovery information
sectype: none
=====Discovery Log Entry 1======
trtype:  tcp
adrfam:  ipv4
subtype: current discovery subsystem
treq:    not specified
portid:  8
trsvcid: 8009
subnqn:  nqn.1992-08.com.netapp:sn.c84b2d40ac3f32ca940fcb7e13e6d933:discovery
traddr:  192.168.56.142
eflags:  explicit discovery connections, duplicate discovery information
sectype: none
=====Discovery Log Entry 2======
trtype:  tcp
adrfam:  ipv4
subtype: nvme subsystem
treq:    not specified
portid:  7
trsvcid: 4420
subnqn:  nqn.1992-08.com.netapp:sn.c84b2d40ac3f32ca940fcb7e13e6d933:subsystem.sub_linux1
traddr:  192.168.56.141
eflags:  none
sectype: none
=====Discovery Log Entry 3======
trtype:  tcp
adrfam:  ipv4
subtype: nvme subsystem
treq:    not specified
portid:  8
trsvcid: 4420
subnqn:  nqn.1992-08.com.netapp:sn.c84b2d40ac3f32ca940fcb7e13e6d933:subsystem.sub_linux1
traddr:  192.168.56.142
eflags:  none
sectype: none
root@linux1:~# nvme connect-all -t tcp -a 192.168.56.141 -s 8009
root@linux1:~# nvme list
Node                  Generic               SN                   Model                                    Namespace Usage                      Format           FW Rev
--------------------- --------------------- -------------------- ---------------------------------------- --------- -------------------------- ---------------- --------
/dev/nvme0n1          /dev/ng0n1            0iAuZq8QZ5UL         NetApp ONTAP Controller                  1           0.00  GB /  21.47  GB      4 KiB +  0 B   FFFFFFFF
root@linux1:~# nvme list-subsys
nvme-subsys0 - NQN=nqn.1992-08.com.netapp:sn.c84b2d40ac3f32ca940fcb7e13e6d933:subsystem.sub_linux1
               hostnqn=nqn.2014-08.org.nvmexpress:uuid:a1ce8f6a-977d-0b92-5b5d-02921e0195a9
               iopolicy=round-robin
\
 +- nvme0 tcp traddr=192.168.56.141,trsvcid=4420,src_addr=192.168.56.21 live optimized
 +- nvme1 tcp traddr=192.168.56.142,trsvcid=4420,src_addr=192.168.56.21 live non-optimized
Discovery on port 8009 returned the two discovery controllers and the subsystem through both LIFs; connect-all connected to both on port 4420. nvme list shows one namespace, and nvme list-subsys shows its two paths with their ANA states: optimized through the namespace’s own node, non-optimized through the partner. Both paths under one subsystem means Linux’s native NVMe multipath is doing its job.
✅ Checkpoint: nvme list-subsys shows one live optimized and one live non-optimized path.
6Match the device to ONTAP, then use it
With NetApp’s nvme-cli plugin you can tie the Linux device back to its ONTAP path:
nvme netapp ontapdevices -o columnroot@linux1:~# nvme netapp ontapdevices -o column
Device Vserver Namespace Path NSID UUID Size
---------------- --------- ------------------------------------------------ ---- -------------------------------------- ---------
/dev/nvme0n1 svm1 /vol/vol_nvme1/ns1 1 d887fe41-d6c4-34e9-3f00-9162a3b9146c 21.47GBThen make a file system, mount it and turn on reconnect at boot:
mkfs.xfs /dev/nvme0n1
mkdir /mnt/nvme
mount /dev/nvme0n1 /mnt/nvme
df -h /mnt/nvme
echo "-t tcp -a 192.168.56.141 -s 8009" >> /etc/nvme/discovery.conf
systemctl enable nvmf-autoconnect.service
You should see this:
root@linux1:~# mkfs.xfs /dev/nvme0n1
Discarding blocks...Done.
meta-data=/dev/nvme0n1           isize=512    agcount=4, agsize=1310720 blks
         =                       sectsz=4096  attr=2, projid32bit=1
         =                       crc=1        finobt=1, sparse=1, rmapbt=1
         =                       reflink=1    bigtime=1 inobtcount=1 nrext64=1
data     =                       bsize=4096   blocks=5242880, imaxpct=25
         =                       sunit=0      swidth=0 blks
naming   =version 2              bsize=4096   ascii-ci=0, ftype=1
log      =internal log           bsize=4096   blocks=16384, version=2
         =                       sectsz=4096  sunit=1 blks, lazy-count=1
realtime =none                   extsz=4096   blocks=0, rtextents=0
root@linux1:~# mkdir /mnt/nvme
root@linux1:~# mount /dev/nvme0n1 /mnt/nvme
root@linux1:~# df -h /mnt/nvme
Filesystem   Size  Used Avail Use% Mounted on
/dev/nvme0n1   20G  142M   20G   1% /mnt/nvme
root@linux1:~# echo "-t tcp -a 192.168.56.141 -s 8009" >> /etc/nvme/discovery.conf
root@linux1:~# systemctl enable nvmf-autoconnect.service
Created symlink /etc/systemd/system/multi-user.target.wants/nvmf-autoconnect.service → /usr/lib/systemd/system/nvmf-autoconnect.service.
The discovery.conf line plus nvmf-autoconnect make linux1 reconnect to the subsystem after a reboot. For a mount that survives the reboot too, add it to /etc/fstab with _netdev,nofail, as you did for iSCSI in Lesson 25.
✅ Checkpoint: df -h /mnt/nvme shows a 20G XFS file system.

7See the host from ONTAP
In the cluster shell:
vserver nvme subsystem controller show -vserver svm1saat-cluster::> vserver nvme subsystem controller show -vserver svm1
Controller
Vserver Subsystem ID LIF Node Host NQN
------- ------------ ---------- ------------- --------------- ----------------------------------------------------------
svm1 sub_linux1 0x0021 svm1_nvme1 saat-cluster-01 nqn.2014-08.org.nvmexpress:uuid:a1ce8f6a-977d-0b92-5b5d-02921e0195a9
svm1 sub_linux1 0x0022 svm1_nvme2 saat-cluster-02 nqn.2014-08.org.nvmexpress:uuid:a1ce8f6a-977d-0b92-5b5d-02921e0195a9
2 entries were displayed.One controller per path, each on its LIF and node, with the host NQN. This is the NVMe version of vserver iscsi session show.
✅ Checkpoint: Two controllers, one on each node.
Try it yourself: Check the SVM’s LIFs and service policies in the Command Builder.
NVMe’s version of “wrong IQN in the igroup”: the host NQN changes. It happens when a server is rebuilt or a VM is cloned, because a fresh nvme-cli install writes a brand new host NQN.
1Pretend linux1 was rebuilt
On linux1, unmount, disconnect and generate a new NQN, the way a rebuilt server would get one:
umount /mnt/nvme
nvme disconnect-all
nvme gen-hostnqn
root@linux1:~# umount /mnt/nvme
root@linux1:~# nvme disconnect-all
root@linux1:~# nvme gen-hostnqn
nqn.2014-08.org.nvmexpress:uuid:2023ab1f-0868-afb9-aa5d-1793201d9f16Now connect using that new NQN, as the rebuilt server would. Use the NQN your own gen-hostnqn printed:
nvme discover -t tcp -a 192.168.56.141 -s 8009 -q nqn.2014-08.org.nvmexpress:uuid:2023ab1f-0868-afb9-aa5d-1793201d9f16
nvme connect-all -t tcp -a 192.168.56.141 -s 8009 -q nqn.2014-08.org.nvmexpress:uuid:2023ab1f-0868-afb9-aa5d-1793201d9f16
nvme list
You’ll get this:
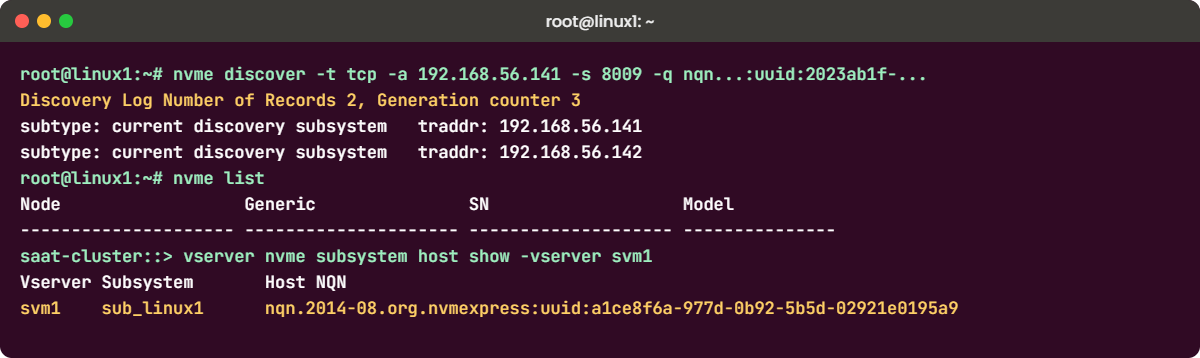
root@linux1:~# nvme discover -t tcp -a 192.168.56.141 -s 8009 -q nqn.2014-08.org.nvmexpress:uuid:2023ab1f-0868-afb9-aa5d-1793201d9f16

Discovery Log Number of Records 2, Generation counter 3
=====Discovery Log Entry 0======
trtype:  tcp
adrfam:  ipv4
subtype: current discovery subsystem
treq:    not specified
portid:  7
trsvcid: 8009
subnqn:  nqn.1992-08.com.netapp:sn.c84b2d40ac3f32ca940fcb7e13e6d933:discovery
traddr:  192.168.56.141
eflags:  explicit discovery connections, duplicate discovery information
sectype: none
=====Discovery Log Entry 1======
trtype:  tcp
adrfam:  ipv4
subtype: current discovery subsystem
treq:    not specified
portid:  8
trsvcid: 8009
subnqn:  nqn.1992-08.com.netapp:sn.c84b2d40ac3f32ca940fcb7e13e6d933:discovery
traddr:  192.168.56.142
eflags:  explicit discovery connections, duplicate discovery information
sectype: none
root@linux1:~# nvme connect-all -t tcp -a 192.168.56.141 -s 8009 -q nqn.2014-08.org.nvmexpress:uuid:2023ab1f-0868-afb9-aa5d-1793201d9f16
root@linux1:~# nvme list
Node                  Generic               SN                   Model                                    Namespace Usage                      Format           FW Rev
--------------------- --------------------- -------------------- ---------------------------------------- --------- -------------------------- ---------------- --------
Discovery still answers, but only with the two discovery controllers: there’s no “nvme subsystem” record, so connect-all quietly connects to nothing and nvme list is empty. ONTAP only advertises a subsystem to hosts it knows.
✅ Checkpoint: Discovery shows 2 records instead of 4 and nvme list is empty.
2Read it on the storage side
In the cluster shell:
vserver nvme subsystem host show -vserver svm1saat-cluster::> vserver nvme subsystem host show -vserver svm1
Vserver Subsystem Host NQN
------- --------------- ----------------------------------------------------------
svm1 sub_linux1 nqn.2014-08.org.nvmexpress:uuid:a1ce8f6a-977d-0b92-5b5d-02921e0195a9The subsystem only knows the old NQN. Compare it with the NQN the host is now using and the problem is obvious.
✅ Checkpoint: You can see the subsystem lists a different NQN from the one the host used.
3Fix it
Add the host’s new NQN to the subsystem (and remove the old one later, once nothing uses it), then connect again from linux1:
vserver nvme subsystem host add -vserver svm1 -subsystem sub_linux1 -host-nqn nqn.2014-08.org.nvmexpress:uuid:2023ab1f-0868-afb9-aa5d-1793201d9f16
vserver nvme subsystem host show -vserver svm1saat-cluster::> vserver nvme subsystem host add -vserver svm1 -subsystem sub_linux1 -host-nqn nqn.2014-08.org.nvmexpress:uuid:2023ab1f-0868-afb9-aa5d-1793201d9f16
saat-cluster::> vserver nvme subsystem host show -vserver svm1
Vserver Subsystem       Host NQN
------- --------------- ----------------------------------------------------------
svm1    sub_linux1      nqn.2014-08.org.nvmexpress:uuid:a1ce8f6a-977d-0b92-5b5d-02921e0195a9
svm1 sub_linux1 nqn.2014-08.org.nvmexpress:uuid:2023ab1f-0868-afb9-aa5d-1793201d9f16
2 entries were displayed.Back on linux1:
nvme connect-all -t tcp -a 192.168.56.141 -s 8009 -q nqn.2014-08.org.nvmexpress:uuid:2023ab1f-0868-afb9-aa5d-1793201d9f16
nvme list
mount /dev/nvme0n1 /mnt/nvme
df -h /mnt/nvme
root@linux1:~# nvme connect-all -t tcp -a 192.168.56.141 -s 8009 -q nqn.2014-08.org.nvmexpress:uuid:2023ab1f-0868-afb9-aa5d-1793201d9f16
root@linux1:~# nvme list
Node Generic SN Model Namespace Usage Format FW Rev
--------------------- --------------------- -------------------- ---------------------------------------- --------- -------------------------- ---------------- --------
/dev/nvme0n1 /dev/ng0n1 0iAuZq8QZ5UL NetApp ONTAP Controller 1 0.15 GB / 21.47 GB 4 KiB + 0 B FFFFFFFF
root@linux1:~# mount /dev/nvme0n1 /mnt/nvme
root@linux1:~# df -h /mnt/nvme
Filesystem Size Used Avail Use% Mounted on
/dev/nvme0n1 20G 142M 20G 1% /mnt/nvmeThe namespace is back with its data. The better long-term fix is on the host: keep /etc/nvme/hostnqn when you rebuild a server, so the storage side never has to change.
✅ Checkpoint: nvme list shows the namespace again and /mnt/nvme is mounted.