Cluster setup: setup wizard and guided setup
-
Phase 0: Start here
-
Phase 1: Architecture and foundation
-
Phase 2: Protocols and day-to-day administration
-
Phase 3: Data protection and enterprise integrations
-
Phase 4: Troubleshooting blueprint
-
Phase 5: Final project and career
A new ONTAP system arrives with nothing set: no cluster, no passwords, no management address. The first hour after power-on decides how the next five years look, because IP addresses, names and passwords chosen in a rush tend to stay forever.
In this lesson you’ll learn what the cluster setup wizard asks and why, how System Manager’s guided setup does the same job in a browser, and what to check right after. Then you’ll take the practice cluster back to factory state and build it again yourself.
Where this lesson fits
Lesson 7 of 56 in NetApp ONTAP Storage Administration · Phase 1: Architecture and foundation · Before this: Lesson 6, hardware · Next: Lesson 8, CLI and System Manager basics
| Time | You need | By the end you can |
|---|---|---|
| 50 minutes | The practice shell and your planned IP addresses (the lab ones are given) | Run the cluster setup wizard, explain each question, and check a new cluster before handing it over |
What it is, in one line
Cluster setup turns brand-new nodes into a working cluster: it creates the node and cluster management addresses, the admin password, the cluster name, DNS and storage failover, either through a command-line wizard or System Manager’s guided setup.
In Simple Words
Moving into a new flat
When you move into a new flat, a few things have to happen before anything else: you get the keys, you put your name on the letterbox, you tell the post office your address, and you set the lock code.
You could do it in any order, but if you skip the address, no letters arrive, and if you choose “1234” as the lock code, anybody can walk in. Doing it once, carefully, with a checklist saves months of trouble.
The setup wizard is that checklist for a cluster: addresses, a name, a strong admin password and DNS, in a fixed order.
Engineer's View
How an engineer describes it
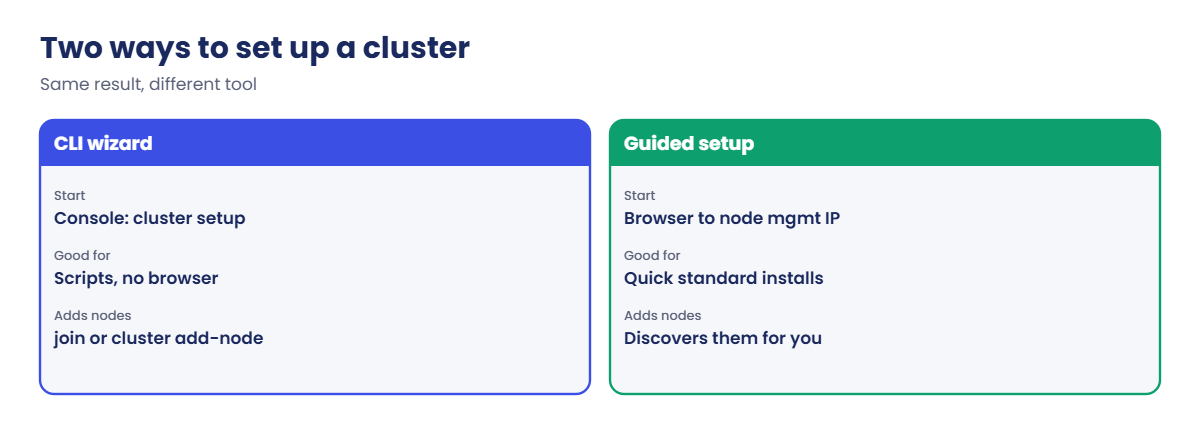
On first boot, each node’s console (through the Service Processor or a serial cable) starts the cluster setup wizard. You give the first node a node management LIF on e0M; at that point you can either carry on in the CLI or open a browser to that IP and use System Manager guided setup, which discovers the other nodes and does the rest with forms.
In the CLI you choose create on the first node, confirm the cluster ports (switched or switchless), set the admin password, the cluster name, licences, the cluster management LIF and gateway, DNS, and the controller location. Additional nodes either join through their own wizard (join) or are added from the cluster with system node show-discovered and cluster add-node. Storage failover turns on once both partners are in.
New systems usually ship with the ONTAP One licence bundle already installed, so the licence step can often be skipped. Since ONTAP 9.10.1, licences are NetApp License Files rather than short keys. After setup you still have to set NTP, check AutoSupport, and run Config Advisor (Lesson 10 covers the first two).
How it works, step by step
1Plan before you power on
Write down the cluster name, the cluster management IP, one node management IP per node, the gateway, DNS servers and domain, NTP servers, and the SP addresses. Take them from your IP plan, never from a DHCP range.
2Start the wizard on node 1
Connect to the console, log in as admin (no password on a new system) and the wizard starts, or type cluster setup. Give node 1 its management IP.
3Create the cluster
Choose create, confirm the cluster interconnect, set the admin password and the cluster name. ONTAP starts the cluster services and the replicated database.
4Admin SVM, DNS and node details
Give the cluster management LIF its IP and gateway, enter DNS, and the location of the controller. Then add the other nodes and let storage failover come up.
5Check before you hand over
Run cluster show, storage failover show, network interface show and network route show. Fix anything odd now, while nobody depends on the cluster.
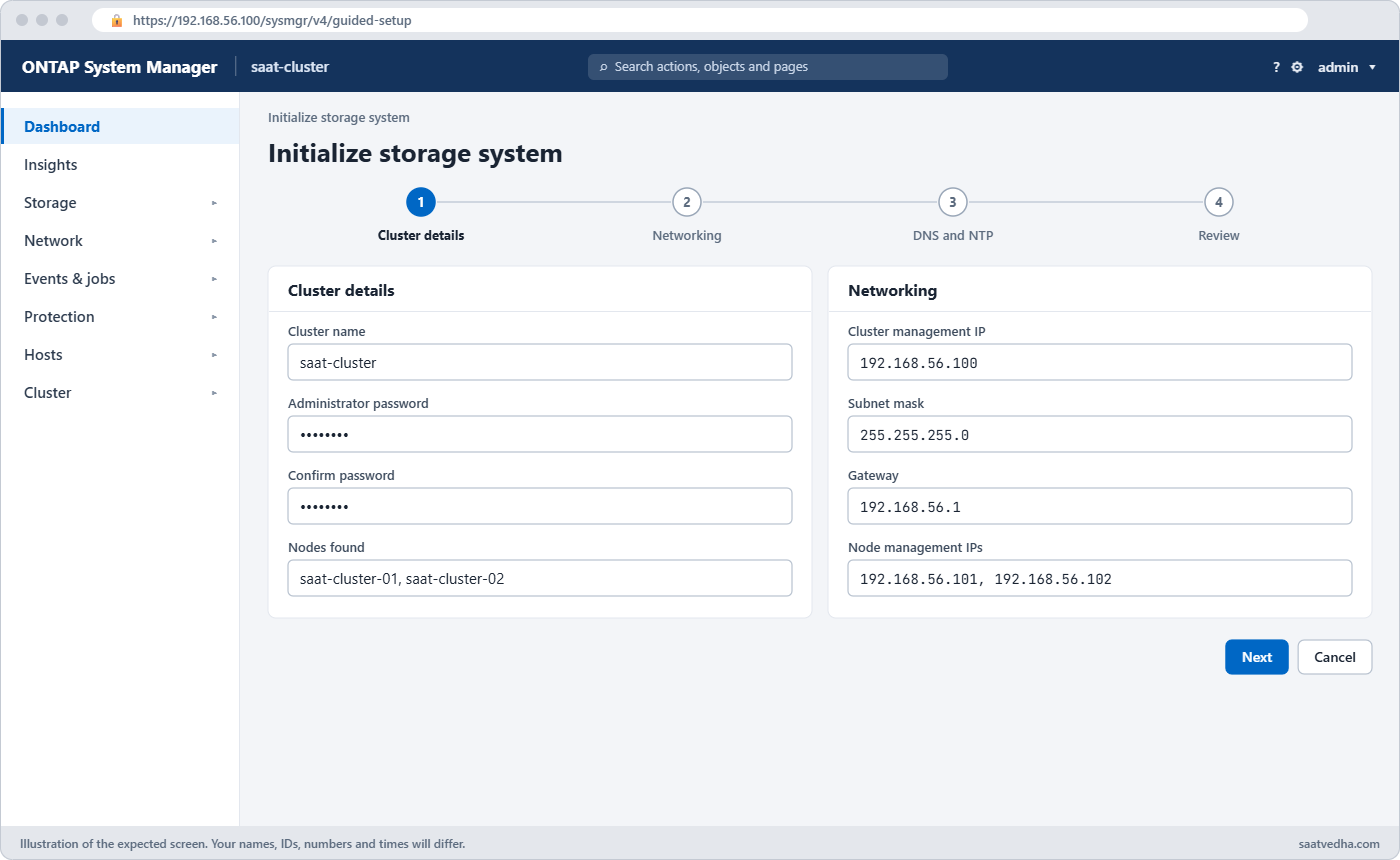
With guided setup, you open https://<node-management-IP> in a browser and System Manager walks you through the cluster name, admin password, networking, DNS and NTP on a few pages, then shows the dashboard.
| Question | Lab answer | Why it matters |
|---|---|---|
| Node management IP | 192.168.56.101 | Per-node access and the first browser login |
| Create or join | create | Only the first node creates the cluster |
| Cluster switches | yes | Switched vs two-node switchless cabling |
| Admin password | saatlab1 (lab only) | Use a long, unique password on real systems |
| Cluster management IP | 192.168.56.100 | The address everyone uses for SSH and System Manager |
| DNS domain and server | saatvedha.lab, 192.168.56.10 | Needed for AutoSupport, AD and name lookups |
Hands-on lab: build the cluster from factory state
Before you run any command, double-check it
Read every command twice before you press Enter. Check the target: the server name, the user, the disk or device name, the path and the sizes. These commands are for learning and were tested in our lab, not on your system. At work, run the read-only commands first, follow your change process, make sure a backup exists, and ask a second person to check anything that changes or deletes data. You run them at your own risk.
This lab uses the SaatVedha ONTAP practice shell, our own learning tool. It is not NetApp software: real ONTAP output looks like this but is not identical.
You’ll wipe the practice cluster back to “just unboxed” and build it again. Use the answers in the table above so later lessons still match.
1Go back to factory state
python ontapsim.py -c "simctl reset --factory"
python ontapsim.pyAt login: type admin and press Enter (no password on a new node). Then check:
cluster showYou should see this:
::> cluster show
Error: This node is not part of a cluster yet. Run "cluster setup" first.The prompt is just ::> because there’s no cluster name yet.
✅ Checkpoint: cluster show says the node is not part of a cluster.
2Start the wizard and set node management
cluster setupAnswer yes, then e0M, 192.168.56.101, 255.255.255.0 and 192.168.56.1. Press Enter at the browser message to stay in the CLI. You should see this:
Welcome to the cluster setup wizard.
...
Type yes to confirm and continue {yes}: yes
Enabling the node management interface on port e0M.
Enter the node management interface port [e0M]: e0M
Enter the node management interface IP address: 192.168.56.101
Enter the node management interface netmask: 255.255.255.0
Enter the node management interface default gateway: 192.168.56.1
A node management interface on port e0M with IP address 192.168.56.101 has been created.
Use your web browser to complete cluster setup by accessing
https://192.168.56.101
Otherwise, press Enter to complete cluster setup using the command line
interface:✅ Checkpoint: The wizard created the node management interface.
3Create the cluster
Answer create, no (not single node), yes (switches), yes (use the cluster ports), then type the password saatlab1 twice (it won’t show) and the name saat-cluster. Press Enter at the licence step. You should see this:
Do you want to create a new cluster or join an existing cluster? {create, join}: create
Do you intend for this node to be used as a single node cluster? {yes, no} [no]: no
Will the cluster network be configured to use network switches? [yes]: yes
Existing cluster interface configuration found:
Port MTU IP Netmask
e0a 9000 169.254.10.20 255.255.0.0
e0b 9000 169.254.10.21 255.255.0.0
Do you want to use this configuration? {yes, no} [yes]: yes
Enter the cluster administrator's (username "admin") password:
Retype the password:
Step 1 of 5: Create a Cluster
...
Enter the cluster name: saat-cluster
Creating cluster saat-cluster
Starting cluster support services ...
Cluster saat-cluster has been created.
Step 2 of 5: Add Feature License Keys
...
Enter an additional license key []:✅ Checkpoint: You see “Cluster saat-cluster has been created.”
4Cluster management, DNS and location
Answer e0M, 192.168.56.100, 255.255.255.0, 192.168.56.1, then saatvedha.lab, 192.168.56.10 and Rack A1. You should see this:
A cluster management interface on port e0M with IP address 192.168.56.100 has been created.
You can use this address to connect to and manage the cluster.
Enter the DNS domain names: saatvedha.lab
Enter the name server IP addresses: 192.168.56.10
DNS lookup for the admin Vserver will use the saatvedha.lab domain.
Step 4 of 5: Configure Storage Failover (SFO)
...
SFO will be enabled when the partner joins the cluster.
Step 5 of 5: Set Up the Node
...
Where is the controller located []: Rack A1
Cluster "saat-cluster" has been created.
To complete cluster setup, you must join each additional node to the cluster
by running "system node show-discovered" and "cluster add-node" from a node in the cluster.
...
(practice shell: node saat-cluster-02 joined the cluster automatically.)
saat-cluster::>The prompt now shows the cluster name. In the practice shell node 2 joins by itself; on real hardware you’d add it with cluster add-node.
✅ Checkpoint: Your prompt reads saat-cluster::>
5Check the new cluster
cluster show
storage failover show
network route show
vserver services name-service dns showYou should see this:
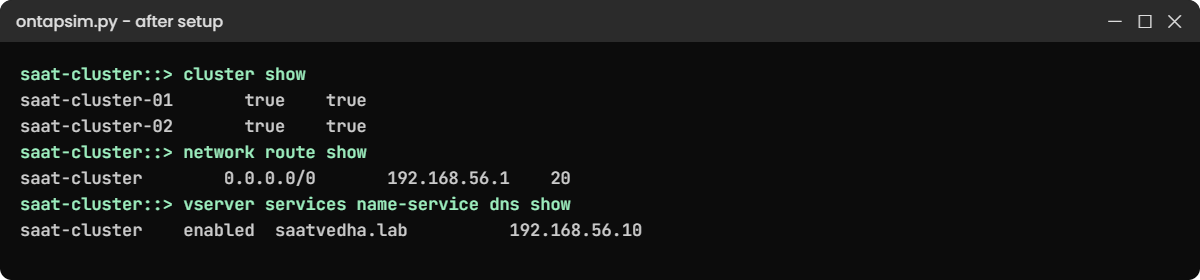
saat-cluster::> cluster show
Node Health Eligibility
--------------------- ------- ------------
saat-cluster-01 true true
saat-cluster-02 true true
2 entries were displayed.
saat-cluster::> storage failover show
...
saat-cluster-01 saat-cluster-02 true Connected to saat-cluster-02
saat-cluster-02 saat-cluster-01 true Connected to saat-cluster-01
saat-cluster::> network route show
Vserver Destination Gateway Metric
------------------- --------------- --------------- ------
saat-cluster
0.0.0.0/0 192.168.56.1 20
saat-cluster::> vserver services name-service dns show
...
Vserver State Domains Servers
--------------- -------- ---------------------- --------------------
saat-cluster enabled saatvedha.lab 192.168.56.10✅ Checkpoint: Both nodes are healthy, takeover is possible, and the default route and DNS are set.
Try it yourself: Open the cluster health check in the Command Builder.
Break It, Then Fix It
ONTAP won’t accept a weak admin password. See what happens when you try.
1Use a short password
simctl reset --factoryLog in again as admin, run cluster setup, accept the defaults with Enter up to the password, and type saat twice. You’ll get this:
Enter the cluster administrator's (username "admin") password:
Retype the password:
The password must be at least 8 characters long and contain at least one letter and one number.The practice shell asks again (in a scripted run it stops the wizard, and cluster show still says the node isn’t in a cluster). Real ONTAP also enforces a minimum length and character mix, and your company’s rules may ask for more.
2Fix it
Type saatlab1 twice and finish the wizard with the lab answers from the lab section. Then confirm:
cluster show✅ Checkpoint: cluster show lists both nodes as healthy.

This happened at work
The address that came from the wrong pool
A pharma plant near Ahmedabad bought a new AFF pair for its lab systems. The installer was in a hurry, and for the cluster management IP he used an address from the plant’s DHCP range because “it was free on the switch”.
Six weeks later a QA laptop got that same address from DHCP. System Manager started timing out, AutoSupport messages went missing, and for two days the storage team blamed the new firmware. A network engineer finally found two MAC addresses fighting over one IP.
The team moved the cluster management LIF to a reserved address with network interface modify, and now every install starts from a signed-off IP sheet, checked against the DHCP scopes before anyone types in the wizard.
Common mistakes and troubleshooting
| Mistake | What happens | Do this instead |
|---|---|---|
| Taking IPs from a DHCP range | Address clashes weeks later | Use reserved addresses from the IP plan |
| A short or shared admin password | Anyone can log in; audit can’t tell who did what | Use a strong password and named accounts (Lesson 22) |
| Choosing switchless when switches are cabled | Cluster ports come up wrong | Answer the switch question to match the real cabling |
| Skipping DNS in the wizard | AutoSupport and later AD joins fail | Enter DNS now; check it with dns show |
| Handing over without checks | Problems found when users are already on it | Run cluster show, sfo show, routes, DNS, Config Advisor |
Interview questions
Click a question to open it. Each one is written the way an interviewer would ask it. Under it you will see why they ask it and one way you could answer, in your own words.
Fresher level
1. What does the cluster setup wizard set up?
Why they ask this: They want to check you know what exists after first setup.
How you might answer: It creates the node management LIF, then the cluster itself with its name and admin password, the cluster management LIF and default route, DNS, and the node location. Storage failover comes up when the partner joins.
2. What’s the difference between a node management LIF and the cluster management LIF?
Why they ask this: They’re checking a basic idea you’ll use every day.
How you might answer: A node management LIF belongs to one node and stays on it. The cluster management LIF manages the whole cluster and can move to another node, so that’s the one I use for SSH and System Manager.
2–5 years experience
3. You’re installing a new cluster tomorrow. What would you prepare tonight?
Why they ask this: They want to see planning habits, not just wizard answers.
How you might answer: I’d prepare the IP sheet: cluster management, node management, SP and gateway, all reserved outside DHCP. I’d also have DNS servers and domain, NTP servers, the cluster name, AutoSupport proxy details if any, and the switch port list checked with the network team.
4. After setup, a colleague says the cluster is ready. What would you check before agreeing?
Why they ask this: They’re checking post-install discipline.
How you might answer: I’d run cluster show, storage failover show, network route show and DNS show, then check NTP and send a test AutoSupport. I’d also run Config Advisor for cabling and save all of that as the handover record.
Senior level
5. When would you use System Manager guided setup instead of the CLI wizard, and why?
Why they ask this: They want to see judgement about tools and teams.
How you might answer: For a standard install with a small team I’d use guided setup because it discovers nodes and fills defaults, so it’s quick and hard to get wrong. For scripted or many identical installs, or when the browser can’t reach the node, I’d use the CLI and keep the answers in a file.
6. A cluster was set up with IPs that clash with another network. How would you fix it with the least disruption?
Why they ask this: They want to see a safe change plan on a live system.
How you might answer: I’d get new addresses reserved first, then change the cluster management LIF with network interface modify from a node management session, so I don’t cut my own connection. Then I’d fix node management and SP addresses one at a time, and update DNS records, monitoring and AutoSupport settings.
Quick quiz
Q1. What is the first thing the wizard creates?
- The cluster management LIF
- The node management LIF on e0M
- A data SVM
- An aggregate
Show answer
B — the wizard starts with the node management interface.
Q2. Which answer do you give on the first node?
- join
- create
- single
- skip
Show answer
B — the first node creates the cluster; others join.
Q3. What password did the shell refuse?
- saatlab1
- saat
- Saat@2026
- admin12345
Show answer
B — it needs at least 8 characters with a letter and a number.
Q4. How do you add more nodes from a running cluster?
- cluster setup on node 1 again
- system node show-discovered and cluster add-node
- storage failover modify
- vserver create
Show answer
B — the wizard’s last message names both commands.
Q5. Which address should admins use for System Manager?
- A node management IP
- The cluster management IP
- An SP IP
- A cluster LIF 169.254 address
Show answer
B — the cluster management LIF manages the whole cluster and can move between nodes.
Quick recap
- Plan every IP and name before power-on, outside DHCP ranges.
- The wizard sets node management, the cluster, admin password, cluster management, DNS and location.
- Guided setup in System Manager does the same in a browser.
- Other nodes join, or are added with cluster add-node.
- Check cluster health, failover, routes and DNS before handing over.
Next lesson
Lesson 8: ONTAP CLI and System Manager basics → You’ll learn to move around the CLI quickly and find the same things in System Manager.
Further reading: ONTAP cluster setup
Want to go deeper into ONTAP cluster setup? Read NetApp’s ONTAP concepts guide for how clusters, nodes and management interfaces fit together before your first install. You can also see the full plan for this course on the NetApp ONTAP Storage Administration course page.
