Secure the Zabbix frontend: HTTPS, firewall and first settings

A fresh install leaves the Zabbix frontend on plain HTTP with the well-known Admin / zabbix login, so anyone on the network can read your passwords off the wire or log straight in as Super admin. In this lesson you set up Zabbix frontend HTTPS with a certificate that browsers accept for the lab name, redirect HTTP to HTTPS, change the Admin password, and open only the ports Zabbix needs in the firewall.

You’ll also set the frontend time zone and your user profile, and finish with a picture of everything you’ve built so far. Lesson 4 adds the first monitored Linux host, and the firewall rules you write here decide whether its agent can reach the server.

Where this lesson fits

Lesson 3 of 24 in Zabbix Monitoring · Phase 1: Zabbix server and agents · Before this: Lesson 2, install Zabbix on Ubuntu · Next: Lesson 4, Zabbix agent 2 on Linux

TimeYou needBy the end you can
About 75 minuteszbx01 with Zabbix 8.0 from Lesson 2 (snapshot zabbix-installed)Serve the frontend over HTTPS with a SAN certificate, lock down ports with ufw and fix the errors you get on the way

What it is, in one line

Securing the Zabbix frontend means encrypting the browser connection with TLS, replacing the default password, and letting through the firewall only the ports for SSH, HTTPS and agent traffic.

In Simple Words

Sealed envelopes and a guarded gate

Imagine a hospital office where staff pass patient files between departments on open sheets. Anybody standing in the corridor can read them. The first fix is to put each file in a sealed envelope with the receiving department’s name printed on it, so only that department opens it and everyone can see if the envelope was meant for them (HTTPS with the right name on the certificate).

The second fix is at the gate. The guard gets a list: visitors go to reception only, ambulances use the emergency bay, and every other door stays locked (the firewall). And the master key that opened every room, the one everybody knew about, is changed on day one.

Engineer's View

What we change and why

AreaDefault after Lesson 2After this lesson
Frontend transportHTTP on port 80, password sent in clear textHTTPS on 443 with TLS 1.2/1.3; port 80 only redirects
CertificateNoneSelf-signed for zbx01.lab with a Subject Alternative Name (SAN) for the name and IP; Let’s Encrypt or your company CA for real systems
Admin loginAdmin / zabbixAdmin / Zbx@Secure2026 (lab only)
guest userAlready disabled (member of the Disabled group)Checked and left disabled
Firewallufw installed but inactive, every port reachableAllow 22 and 443 from the lab network, 80 for the redirect, 10051 from the lab network; deny everything else
Time zone“System” default in Administration > General > GUIAsia/Kolkata (or yours) for the system and for your user

Browsers stopped trusting the certificate Common Name (CN) years ago: the host name must appear in the Subject Alternative Name extension, or Chrome shows NET::ERR_CERT_COMMON_NAME_INVALID even if you trust the certificate. OpenSSL 3 lets you add the SAN in one command with -addext.

Zabbix 8.0 also enforces a password policy by default (Users > Authentication): at least 8 characters, and it rejects easy-to-guess passwords and anything containing the user’s name or username. So Zbx@Admin2026 is refused for user Admin, which is why the lab uses Zbx@Secure2026.

How it works, step by step

1The browser checks the certificate

When you open https://zbx01.lab, Nginx sends its certificate. The browser checks three things: that the name you typed is in the SAN list, that the certificate is in date, and that it was signed by an authority it trusts. A self-signed certificate fails the third check until you import it into your laptop’s trust store, which is fine for a lab and wrong for production.

2Port 80 only redirects

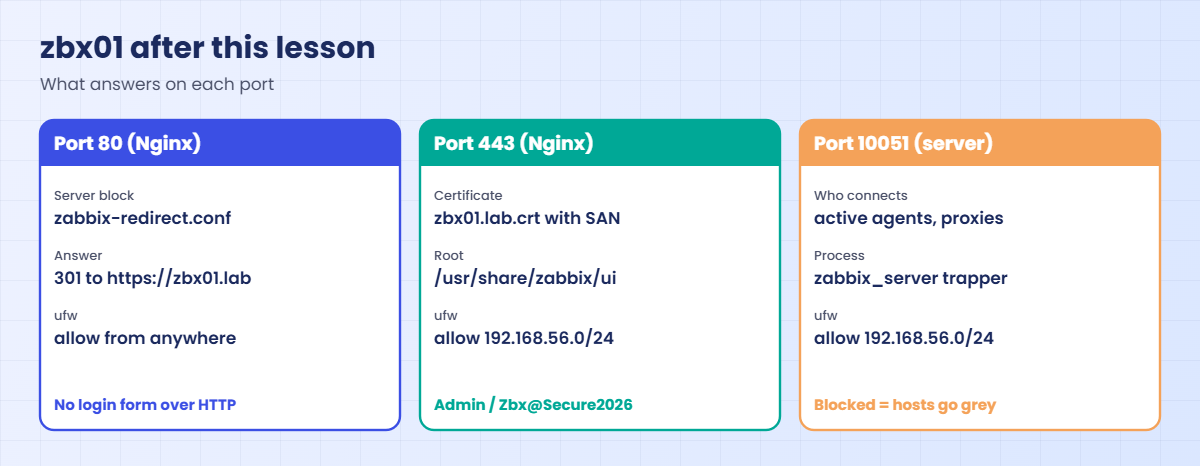
A second small server block listens on port 80 and answers every request with 301 Moved Permanently to the same path on https. People who type the bare name still land on the secure page, and no form with a password is ever served over plain HTTP. The diagram below shows the full layout of zbx01 after this lesson.

Zabbix frontend HTTPS on zbx01: port 80 redirect, port 443 Nginx and port 10051 for active agents

3ufw decides what reaches zbx01

ufw (Uncomplicated Firewall) writes nftables or iptables rules for you. Its default policy is deny incoming and allow outgoing, so once you enable it only the ports you allow get through. Always add the SSH rule first, or you lock yourself out of the VM the moment you run ufw enable.

4Which Zabbix ports need to be open

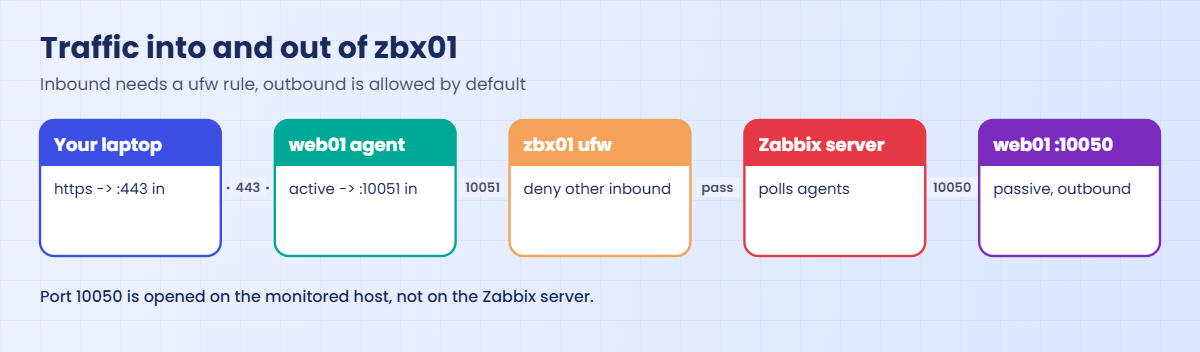
zbx01 receives three kinds of traffic: you on 443, active agents and proxies on 10051, and SSH on 22. It doesn’t need 10050 open, because 10050 is the port the server connects to on the agents, and outgoing traffic is allowed by default. The diagram below maps each flow to its rule.

Zabbix frontend HTTPS and firewall: inbound 443 and 10051 through ufw, outbound passive checks to 10050

5Overview of the lab so far

PieceWhereState after Lesson 3
Zabbix server 8.0zbx01Running, listening on 10051, DB password in /etc/zabbix/zabbix_server.conf
MySQL 8.4zbx01Database zabbix, user zabbix@localhost
Frontendzbx01https://zbx01.lab, Nginx + php8.5-fpm, Admin / Zbx@Secure2026
Agent 2zbx01Monitors the server itself (host “Zabbix server”)
Firewallzbx01ufw: 22, 80, 443 and 10051 allowed from 192.168.56.0/24
web01192.168.56.81Plain Ubuntu, gets agent 2 in Lesson 4

Hands-on lab: HTTPS, a new Admin password and ufw on zbx01

Before you run any command, double-check it

Read every command twice before you press Enter. Check the target: the server name, the user, the disk or device name, the path and the sizes. These commands are for learning and were tested in our lab, not on your system. At work, run the read-only commands first, follow your change process, make sure a backup exists, and ask a second person to check anything that changes or deletes data. You run them at your own risk.

All commands run on zbx01 unless the step says otherwise. Keep an SSH session open the whole time; if you make a firewall mistake you can still fix it from the VirtualBox console. The password Zbx@Secure2026 is for this lab only.

1Change the Admin password

Log in at http://zbx01.lab as Admin / zabbix. Click the user icon at the bottom of the left menu, then User settings > Profile, click Change password, enter the current password zabbix and the new one Zbx@Secure2026 twice, and click Update. Zabbix logs you out; log in again with the new password.

If you try Zbx@Admin2026 instead, you’ll see:

Cannot update user
Incorrect value for field "/1/passwd": must not contain user's name, surname or username.

The default password policy compares the new password with the username, name and surname (Admin, Zabbix, Administrator) without caring about case, so anything with “admin” in it is refused. You can see and change the rules under Users > Authentication.

✅ Checkpoint: You can log in as Admin with Zbx@Secure2026, and zabbix no longer works.

2Check that guest stays disabled

Open Users > Users and click guest. In Zabbix 8.0 the guest user is a member of the Disabled user group out of the box, so the login page has no “sign in as guest” link. Leave it that way: an enabled guest lets anyone on the network browse your monitoring without a password.

Username  Name    Surname        User role         Groups
Admin     Zabbix  Administrator  Super admin role  Internal, Zabbix administrators
guest                            Guest role        Disabled, Guests, Internal

✅ Checkpoint: Users > Users shows guest as a member of the Disabled group.

3Create a certificate with a SAN

Run this on zbx01:

sudo openssl req -x509 -newkey rsa:2048 -sha256 -days 825 -nodes \
  -keyout /etc/ssl/private/zbx01.lab.key -out /etc/ssl/certs/zbx01.lab.crt \
  -subj "/CN=zbx01.lab" \
  -addext "subjectAltName=DNS:zbx01.lab,IP:192.168.56.80"
sudo chmod 600 /etc/ssl/private/zbx01.lab.key
openssl x509 -in /etc/ssl/certs/zbx01.lab.crt -noout -subject -enddate -ext subjectAltName

You should see this (your expiry date will differ):

subject=CN=zbx01.lab
notAfter=Feb 10 06:15:21 2029 GMT
X509v3 Subject Alternative Name:
    DNS:zbx01.lab, IP Address:192.168.56.80

-nodes leaves the key without a passphrase so Nginx can start unattended, which is why the key file must be readable by root only. 825 days is the longest validity Apple devices accept for a TLS certificate. For a real server with a public name, use Let’s Encrypt with certbot --nginx or a certificate from your company CA instead.

✅ Checkpoint: The certificate lists DNS:zbx01.lab and IP Address:192.168.56.80 in its SAN.

4Switch the Nginx server block to HTTPS

Edit /etc/zabbix/nginx.conf with sudo nano. Change the listen 80; line and add the TLS lines under server_name, leaving the rest of the file (root, PHP locations) as it is:

The top of the server block should look like this:

server {
        listen          443 ssl;
        http2           on;
        server_name     zbx01.lab;

        ssl_certificate     /etc/ssl/certs/zbx01.lab.crt;
        ssl_certificate_key /etc/ssl/private/zbx01.lab.key;
        ssl_protocols       TLSv1.2 TLSv1.3;
        add_header Strict-Transport-Security "max-age=31536000" always;

        root    /usr/share/zabbix/ui;

Then add a separate file for the redirect, so port 80 answers only with a 301:

Run this on zbx01:

sudo tee /etc/nginx/conf.d/zabbix-redirect.conf >/dev/null <<'EOF'
server {
        listen 80;
        server_name zbx01.lab 192.168.56.80;
        return 301 https://zbx01.lab$request_uri;
}
EOF
sudo nginx -t && sudo systemctl reload nginx

You should see this:

nginx: the configuration file /etc/nginx/nginx.conf syntax is ok
nginx: configuration file /etc/nginx/nginx.conf test is successful

http2 on; is the form Nginx 1.25 and later use (Ubuntu 26.04 has 1.28); older guides put http2 on the listen line, which now gives a deprecation warning. The HSTS header tells browsers to use HTTPS for this name for a year, so only add it once HTTPS works.

✅ Checkpoint: nginx -t says “test is successful” and nginx reloads without errors.

5Test the redirect and TLS from zbx01

Run this on zbx01:

curl -sI http://zbx01.lab/ | head -3
curl -s -o /dev/null -w '%{http_code}\n' --cacert /etc/ssl/certs/zbx01.lab.crt https://zbx01.lab/
echo | openssl s_client -connect zbx01.lab:443 -servername zbx01.lab 2>/dev/null | grep -E '^subject=|^New,'

You should see this (your date will differ):

HTTP/1.1 301 Moved Permanently
Server: nginx/1.28.3 (Ubuntu)
Date: Sun, 08 Nov 2026 07:02:11 GMT
200
subject=CN=zbx01.lab
New, TLSv1.3, Cipher is TLS_AES_256_GCM_SHA384

The 301 proves port 80 redirects, the 200 proves curl trusts the certificate when given it and the name matches the SAN, and the last line shows the session uses TLS 1.3. The zbx01.lab name works on zbx01 because you added it to /etc/hosts in Lesson 1.

✅ Checkpoint: curl shows a 301 on http and a 200 on https, and openssl reports TLSv1.3.

6Trust the certificate on your laptop

Copy the certificate to your laptop: scp student@zbx01.lab:/etc/ssl/certs/zbx01.lab.crt .. On Windows, double-click it, choose Install Certificate, Current User, and place it in Trusted Root Certification Authorities. On macOS, open it in Keychain Access, then set Always Trust.

On Ubuntu desktop, copy it to /usr/local/share/ca-certificates/ and run sudo update-ca-certificates. Firefox keeps its own store: Settings > Privacy & Security > Certificates > View Certificates > Authorities > Import.

Restart the browser and open http://zbx01.lab. It should jump to https://zbx01.lab and show a padlock with no warning.
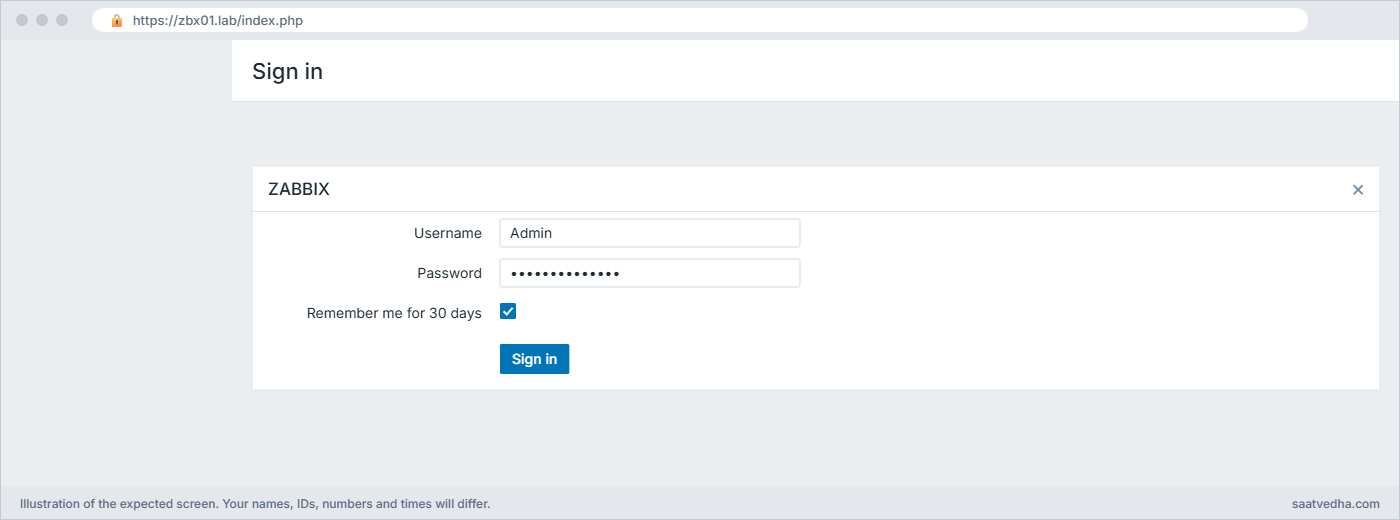
Zabbix frontend HTTPS: the Zabbix 8.0 sign-in page opened at https://zbx01.lab
The sign-in page at https://zbx01.lab, with a padlock in the address bar once the certificate is trusted

✅ Checkpoint: https://zbx01.lab opens with a padlock and no certificate warning on your laptop.

7Open only the needed ports with ufw

Run this on zbx01 (SSH rule first):

sudo ufw allow from 192.168.56.0/24 to any port 22 proto tcp
sudo ufw allow 80/tcp
sudo ufw allow from 192.168.56.0/24 to any port 443 proto tcp
sudo ufw allow from 192.168.56.0/24 to any port 10051 proto tcp comment 'Zabbix active agents and proxies'
sudo ufw enable
sudo ufw status numbered

You should see:

Rules updated
Rules updated
Rules updated (v6)
Rules updated
Rules updated
Command may disrupt existing ssh connections. Proceed with operation (y|n)? y
Firewall is active and enabled on system startup
Status: active

     To                         Action      From
     --                         ------      ----
[ 1] 22/tcp                     ALLOW IN    192.168.56.0/24
[ 2] 80/tcp                     ALLOW IN    Anywhere
[ 3] 443/tcp                    ALLOW IN    192.168.56.0/24
[ 4] 10051/tcp                  ALLOW IN    192.168.56.0/24            # Zabbix active agents and proxies
[ 5] 80/tcp (v6)                ALLOW IN    Anywhere (v6)

Each allow prints Rules updated while ufw is still off, and the 80/tcp rule adds a second IPv6 copy, hence the (v6) lines. The y/n question appears only because you’re logged in over SSH.

Your SSH session survives because rule 1 allows it. Port 80 is open to everyone only so the redirect works; the actual frontend on 443 and the trapper port 10051 accept only the lab network. Port 10050 isn’t needed on zbx01 for remote hosts, because the local agent is polled over 127.0.0.1.

✅ Checkpoint: ufw is active with rules for 22, 80, 443 and 10051, and your SSH session is still connected.
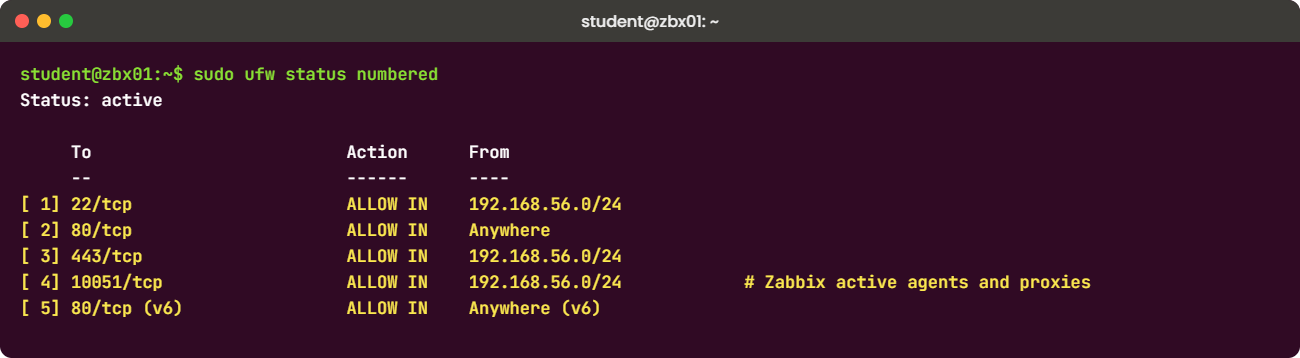
Zabbix frontend HTTPS lab: ufw status with rules for 22, 80, 443 and 10051
ufw allows SSH, HTTP for the redirect, HTTPS and 10051 from the lab network

8Set the time zone and your profile

Open Administration > General > GUI and set Default time zone to (UTC+05:30) Asia/Kolkata (or yours), then click Update. Then open the user icon, User settings > Profile: set Time zone to “System default”, Refresh to 30s, Rows per page to 50, and choose a Theme you like (8.0 adds a dark blue theme next to Blue, Dark and the high-contrast ones).
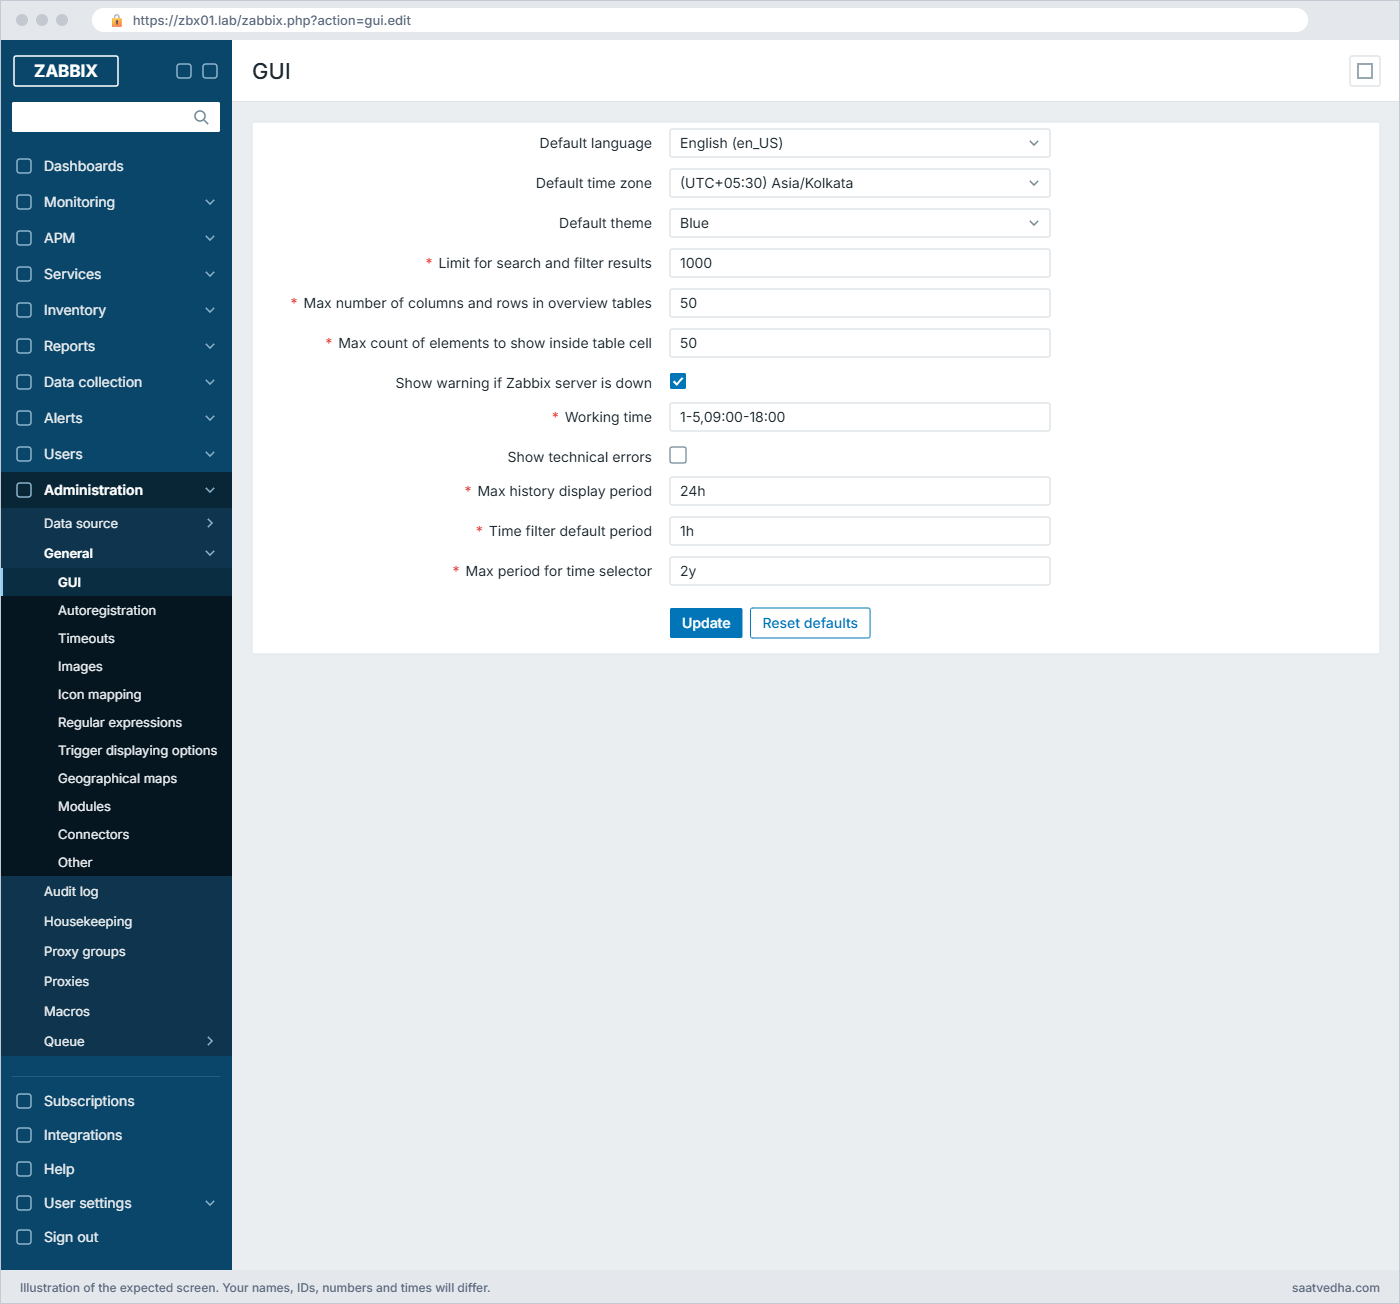
Zabbix frontend HTTPS lab: Administration > General > GUI with default time zone Asia/Kolkata” class=”wp-image-10191″ width=”1400″ height=”1304″ style=”width:100%;height:auto;border-radius:10px;” /><figcaption style=Administration > General > GUI with the default time zone set to Asia/Kolkata

Check the time shown in the frontend: open Reports > System information and compare the clock at the top of a dashboard with date on zbx01. They should match to the minute.

✅ Checkpoint: Administration > General > GUI shows your time zone, and graph timestamps match the time on zbx01.

9Take a snapshot

Shut zbx01 down and take a VirtualBox snapshot called https. From now on the frontend address for the course is https://zbx01.lab.

✅ Checkpoint: zbx01 has snapshots base, zabbix-installed and https.

Break It, Then Fix It

Three things that go wrong when people secure Zabbix. Keep your SSH session open; for the last one you’ll need web01 running.

1nginx -t fails after an edit

Make two small typos in /etc/zabbix/nginx.conf: change the key file name to zbx01.lab.kye, and test.

Run this on zbx01:

sudo sed -i 's#zbx01.lab.key;#zbx01.lab.kye;#' /etc/zabbix/nginx.conf
sudo nginx -t

You’ll get this error:

nginx: [emerg] cannot load certificate key "/etc/ssl/private/zbx01.lab.kye": BIO_new_file() failed (SSL: error:80000002:system library::No such file or directory:calling fopen(/etc/ssl/private/zbx01.lab.kye, r) error:10000080:BIO routines::no such file)
nginx: configuration file /etc/nginx/nginx.conf test failed

Nginx checks that it can read every certificate and key during the test. Because you ran nginx -t before reloading, the running Nginx is untouched and the site stays up. Now try a missing semicolon after ssl_protocols TLSv1.2 TLSv1.3: the error becomes invalid value "add_header" in /etc/zabbix/nginx.conf:9, because Nginx reads the next line as more values for the same directive, so look at the line above the one it names.

Fix:

sudo sed -i 's#zbx01.lab.kye;#zbx01.lab.key;#' /etc/zabbix/nginx.conf
sudo nginx -t && sudo systemctl reload nginx

✅ Checkpoint: nginx -t is successful again and the site loads.

2Certificate without a SAN

Make a second certificate with only a CN, the way many older guides do, and test it with curl.

Run this on zbx01:

cd /tmp
openssl req -x509 -newkey rsa:2048 -nodes -days 30 -keyout nosan.key -out nosan.crt -subj "/CN=zbx01"
sudo cp /etc/ssl/certs/zbx01.lab.crt /etc/ssl/certs/zbx01.lab.crt.good
sudo cp /etc/ssl/private/zbx01.lab.key /etc/ssl/private/zbx01.lab.key.good
sudo cp nosan.crt /etc/ssl/certs/zbx01.lab.crt; sudo cp nosan.key /etc/ssl/private/zbx01.lab.key
sudo systemctl reload nginx
curl -sS --cacert nosan.crt https://zbx01.lab/ -o /dev/null

You’ll get this error:

curl: (60) SSL: certificate subject name 'zbx01' does not match target host name 'zbx01.lab'
More details here: https://curl.se/docs/sslcerts.html

curl failed to verify the legitimacy of the server and therefore could not
establish a secure connection to it. To learn more about this situation and
how to fix it, please visit the webpage mentioned above.

The certificate is trusted (you passed it with --cacert), but the name doesn’t match. Chrome and Edge show NET::ERR_CERT_COMMON_NAME_INVALID for the same reason, and they ignore the CN completely, so even /CN=zbx01.lab without a SAN fails in a browser.

Fix: put the good certificate back:

sudo mv /etc/ssl/certs/zbx01.lab.crt.good /etc/ssl/certs/zbx01.lab.crt
sudo mv /etc/ssl/private/zbx01.lab.key.good /etc/ssl/private/zbx01.lab.key
sudo systemctl reload nginx
curl -s -o /dev/null -w '%{http_code}\n' --cacert /etc/ssl/certs/zbx01.lab.crt https://zbx01.lab/

✅ Checkpoint: curl returns 200 with the SAN certificate and the browser shows a padlock again.

3ufw blocks 10051 and active agents go quiet

This one shows what Lesson 4 will hit if the rule is missing. Delete the 10051 rule and test from web01:

Run this on zbx01, then the test on web01:

sudo ufw delete allow from 192.168.56.0/24 to any port 10051 proto tcp
# on web01:
nc -vz -w 3 192.168.56.80 10051

You’ll get this error (on web01):

nc: connect to 192.168.56.80 port 10051 (tcp) timed out: Operation now in progress

“Timed out” means the packets are silently dropped (ufw’s default deny), not refused. An active agent on web01 would log cannot connect to [192.168.56.80:10051]: ... i/o timeout followed by active check configuration update from host [web01] started to fail, and its host would turn grey, while the server itself looks perfectly healthy. Compare that with “Connection refused”, which means the port is reachable but nothing is listening.

Fix:

sudo ufw allow from 192.168.56.0/24 to any port 10051 proto tcp comment 'Zabbix active agents and proxies'
# on web01:
nc -vz -w 3 192.168.56.80 10051
Connection to 192.168.56.80 10051 port [tcp/zabbix-trapper] succeeded!

✅ Checkpoint: nc from web01 to 192.168.56.80 port 10051 succeeds.

This happened at work

The password on the corridor network

Our on-call engineer at a hospital group in Kochi found this during a routine audit. The Zabbix frontend for all five hospitals had been on plain HTTP since it was installed, on the reasoning that it was “internal only”. The internal network included the guest Wi-Fi VLAN in two buildings, because of an old routing shortcut nobody had removed.

The first suggestion in the meeting was to move Zabbix to a different port, which doesn’t hide anything from someone watching traffic. A packet capture during the audit then showed the Admin login posted in clear text, and the Admin password was still the one from the install three years earlier, shared by the whole team.

The team put the frontend behind HTTPS with a certificate from the hospital’s internal CA (with the proper SAN for the DNS name), redirected port 80, gave every engineer their own account and locked the old shared Admin password in the vault for emergencies only. The network team also restricted 443 and 10051 on the Zabbix server to the management VLANs.

The audit report’s main point was simple: “internal” isn’t a security control, and a monitoring server that holds credentials for every host deserves the same care as the hosts it watches.

Common mistakes and troubleshooting

MistakeWhat happensWhat to do instead
Running ufw enable before allowing SSHYour SSH session drops and you need the VM consoleAlways add the port 22 rule first, then enable
Making a certificate with only a CNBrowsers show NET::ERR_CERT_COMMON_NAME_INVALID even after you trust itAdd subjectAltName with every DNS name and IP you use
Reloading Nginx without nginx -tA typo takes the frontend down for everyoneTest first: sudo nginx -t && sudo systemctl reload nginx
Blocking 10051 on the serverActive agents and proxies can’t send data and hosts go greyAllow 10051 from the agent and proxy networks
Opening 10050 on the server “for agents”An unneeded open port, while agents still fail10050 is opened on the monitored hosts, for passive checks from the server
Using a password containing the usernameZabbix 8.0 refuses it with “must not contain user’s name, surname or username”Pick a password without your username, or relax the policy in Users > Authentication (not advised)
Leaving the key file world-readableAnyone on the box can copy the private key and impersonate the serverchmod 600 the key and keep it under /etc/ssl/private

Interview questions

Click a question to open it. Each one is written the way an interviewer would ask it. Under it you will see why they ask it and one way you could answer, in your own words.

Fresher level

1. Why should the Zabbix frontend run on HTTPS if it is only used inside the company?

Why they ask this: They want to see that you don’t treat “internal” as safe.

How you might answer: Without HTTPS the login form sends the password in clear text, so anyone who can capture traffic on that network can read it, and internal networks are shared with many devices. The Zabbix frontend also shows host names, IPs and sometimes credentials in macros, so it’s worth protecting.

I’d use the company CA or Let’s Encrypt, redirect port 80 to 443 and turn off TLS versions older than 1.2.

2. Which ports would you open on the Zabbix server’s firewall?

Why they ask this: A check that you know the direction of each Zabbix flow.

How you might answer: I open 443 for users, and 10051 for active agents, proxies and zabbix_sender, both only from the networks that need them, plus 22 from the admin network. Port 10050 is opened on the monitored hosts for passive checks, not on the server.

2–5 years experience

3. A user says Chrome shows NET::ERR_CERT_COMMON_NAME_INVALID on Zabbix, even though the certificate is trusted. What is wrong?

Why they ask this: They want to know if you understand SAN versus CN.

How you might answer: Chrome ignores the Common Name and only checks the Subject Alternative Name list. The certificate was probably made with only a CN, or the name the user typed (maybe the short name or the IP) isn’t in the SAN list.

I’d check it with openssl x509 -noout -ext subjectAltName and reissue it with every DNS name and IP people use.

4. After enabling ufw on the Zabbix server, all hosts using active checks go grey but passive hosts are fine. Walk me through it.

Why they ask this: They are checking whether you can reason from symptoms to the flow that broke.

How you might answer: Passive checks are outgoing connections from the server to agents on 10050, which ufw allows by default. Active agents connect in to the server on 10051, so if that port isn’t allowed their connections time out and the server stops getting their data.

I’d confirm with nc -vz zbx01 10051 from an agent host and the agent log, then add an allow rule for 10051 from the agent networks.

Senior level

5. How would you handle certificates for 40 Zabbix frontends and proxies across environments?

Why they ask this: They want to hear about automation and expiry, not a manual process.

How you might answer: I’d issue them from an internal CA or ACME (Let’s Encrypt for public names, an internal ACME server like step-ca otherwise) and deploy them with Ansible, with the same Nginx template everywhere. Certificates for agent-to-server encryption would be separate from the web certificates.

I’d also monitor expiry with Zabbix itself, using web.certificate.get on agent 2 with a trigger at 21 days, so a renewal failure becomes a problem before it becomes an outage.

6. Your security team wants SSO and MFA for the Zabbix frontend. What options does Zabbix give you?

Why they ask this: They are checking awareness of the built-in authentication features.

How you might answer: Zabbix supports LDAP and SAML 2.0 authentication under Users > Authentication, with JIT user provisioning from LDAP or SAML groups, and it has built-in MFA with TOTP or Duo. I’d use SAML with the company IdP for normal staff and keep one local Super admin with a long vault-stored password as a break-glass account.

I’d also look at the password policy, login blocking after failed attempts, and the audit log to track who changed what.

Quick quiz

Q1. Which certificate field do modern browsers check for the host name?

  1. Common Name (CN)
  2. Subject Alternative Name (SAN)
  3. Issuer
  4. Serial number
Show answer

B — Browsers check only the SAN list; a CN-only certificate fails.

Q2. Which port must the Zabbix server allow in for active agents?

  1. 10050
  2. 10051
  3. 10052
  4. 3306
Show answer

B — Active agents and proxies connect to the server on 10051.

Q3. What should you do before running ufw enable over SSH?

  1. Reboot the VM
  2. Allow port 22
  3. Stop Nginx
  4. Disable IPv6
Show answer

B — Without an SSH rule, enabling ufw cuts your session.

Q4. Why does Zabbix 8.0 refuse the password Zbx@Admin2026 for user Admin?

  1. It is too short
  2. It has no digits
  3. It contains the username
  4. Special characters are not allowed
Show answer

C — The default policy rejects passwords that contain the user’s name, surname or username.

Q5. nc to port 10051 reports “timed out”. What does that usually mean?

  1. The server is listening but busy
  2. A firewall is silently dropping the packets
  3. The agent is misconfigured
  4. DNS failed
Show answer

B — Timed out means no reply at all, typically a drop rule. “Connection refused” means nothing is listening.

Quick recap

  • The frontend now runs on https://zbx01.lab with a self-signed certificate that has a SAN for the name and IP, and port 80 only redirects.
  • Admin’s password is Zbx@Secure2026 in this lab; Zabbix 8.0 rejects passwords that contain the username.
  • ufw allows 22, 443 and 10051 from the lab network and 80 for the redirect; 10050 belongs on the monitored hosts.
  • Always run nginx -t before reloading, and read the line above the one an [emerg] error names.
  • zbx01 has a snapshot called https, and the time zone is set for the system and your user.

Next lesson

Lesson 4: Install Zabbix agent 2 on Linux: passive and active checks → You install agent 2 on web01, connect it to the server with both passive and active checks, and watch its data arrive in Latest data.

Further reading: Zabbix frontend HTTPS

Want to go deeper into Zabbix frontend HTTPS? The Zabbix manual has a page on secure setup best practices covering HTTPS, headers and user accounts, and Users > Authentication explains the password policy, LDAP, SAML and MFA. Ubuntu’s firewall guide covers ufw in more depth.

For another example of putting a monitoring UI behind Nginx with HTTPS, see Secure Prometheus. You can also see the full plan for this course on the Zabbix Monitoring course page.

Scroll to Top

This website uses cookies

We use a few cookies to keep this site working. If you allow it, we also use Google Analytics to count visits so we can improve our lessons. You can accept all, deny the optional ones, or choose what to allow.